
In this article, we will explain to you in detail how to draw the famous animated family of the Simpsons easily, and using just a pencil and a sheet of paper.
In order to draw a Simpson character, what you must take into account is the shapes “to build” their structures and to use these (geometrical) shapes in parts of their body such as the round eyes or their oval ears.
If you want to get your own online Simpson cartoon for you, your friends or your family, click here!
How to draw Marge Simpson?
Let’s start drawing Marge Simpson. Take into account we will only focus on drawing her head and hair, not the whole body.
First, draw a small circle for her left eye. Try to make it as round as possible, remember that the Simpsons cartoons are characterized for their very geometrical shapes. After that, draw a short straight line from the lower half of the circle to the right and make a short curve downwards, like a letter “c” backwards. You already get the nose!
Attached to this circle, from the upper half of it, draw a semicircle to get the right eye. It will not be a complete circle, as you get the nose and the left eye covering it up. Remember to do it as round as possible. Now, make two dots inside the circles to draw her pupils. Right! The eyes and the nose are ready!
Now, from below the right eye, draw a short slightly curved line downwards, and then a long curved line from right to left and add a very short oblique line at the end to form the expression of her mouth. You get her lips! Add four or five short lines above the circles for her eyelashes. Do not make them too straight, but with a slight curve backwards.
Next, from the center part of her mouth, make a very short curve downwards and to the left -this is to draw her chin- and, immediately, make a longer straight line downwards for her neck. At this point you will get the whole face of Marge Simpson!
Let’s continue with the hardest part: her hair. Right above her eyelashes, draw the base of her hair by making some little curves, like drawing a cloud. More exactly, draw four curves above and two bigger curves to the left, next to her eyes. Be careful while doing this: these curves should not be too round or too expanded. Try to make it neat, but casual.
Next, draw a letter “c” to get her ear, and a little letter “T” inside. Draw the back of Marge’s neck by making a straight line from the bottom of the ear downwards, and make four or five little circles for her necklace and two smaller semi circles at the end. Bare in mind that the circles should be smaller as they are farther away.
Finally, to finish her hair, draw a bunch of humps starting right below her ear, more or less at the same level of her smile, until the top and keep going down until the top of her right eye. Be careful: do it as neat as possible. Do not make some “humps” much bigger than others and do not make the hair very tall or very short.
At first, it may be tedious and a bit frustrating, but practise makes perfect! Now you know how to draw Marge Simpson’s face!
Click here to learn how to draw Marge Simpson!
How to draw Homer Simpson?
Now let’s continue with Homer. Begin in the same way as in Marge’s drawing: make a circle for his left eye. (Remember: a very round circle.) Right below it, continue making the nose by drawing a letter “c” backwards.
Once you get it, extend the line by making a large curve to draw his beard. It should look like a letter “s” backwards, in which the first curve (for the nose) is small and the bottom curve (for the beard) is much larger.
Continue drawing the right eye as in the same way of Marge’s drawing: make a circle (not complete) attached to the left eye. Finish the pupils by making two dots in the left center area of the circles. You already got Homer’s nose, beard and eyes!
From the below the right eye, make a little curved line and then a larger hump to get his upper lip. Then, double this line back, forming his (open) mouth and double it back again. You are drawing his lower lip and forming a smile. Draw four vertical lines between the lips, there you get his teeth. Be careful in not making them too separated or crammed together.
Let’s sketch now Homer’s head. It may be hard to do, so be patient: Make a little hump above the right eye and extend a line above his face forming his head. The same as Marge’s drawing, make a “c” line to get his ear and rounded oblique “T” for the details inside.
Add a slightly curved line above the ear to get the back of his neck. Finally, draw two curved lines for his hair. Do not make them too tall or long, otherwise the hair may look strange. Finally, add lines with a “M” above his ear to finish it.
That is all! Homer’s face is ready!
Click here to learn how to draw Homer Simpson!
How to draw Lisa Simpson?
Now, let’s continue drawing Lisa’s face. For some people, this is the easiest character to draw. For other people, this is the hardest one.
Start drawing a circle for her eye. Attached below the circle, draw her nose by making a “c” backwards and draw the second eye. Remember: we will always insist on the shapes of the lines and forms: the eyes must be perfectly geometrical. Add two dots inside the circles in the left center part of the circles.
To shape her head and hair, make a short line starting from the middle of the right eye and draw one angle, similar to a triangle. Continue making seven more angles, shaping her head. Pay attention to the two last angles, make them smaller than the rest. (See the reference picture).
Now, draw a “c” for her ear and oblique “T” inside for the details. Make a straight line below her ear to form the back of her neck. You already got Lisa’s head!
After that, draw her mouth by making a curve from below her right eye and curve it back to shape her smile. Finally, for her lower lip, draw in the middle of her smile a very small curve and a straight line, similar to a “?” sign.
Add four perfectly round circles and a fifth semicircle for her necklace. You finished your Lisa Simpson’s drawing!
Click here to learn how to draw Lisa Simpson!
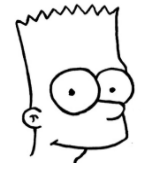
How to draw Bart Simpson?
Finally, to make a good drawing of Bart Simpson, start drawing a circle for his eye, a “c” backwards for his nose and another incomplete circle for the other eye. Do not forget to mark two dots for his pupils.
Continue shaping his head. For that, make a very little hump above his right eye and then a straight line for his forehead. To draw his hair, make a slightly oblique and small angle, similar to a triangle and then approximately 8 very small triangles. Do not make them perfectly ordered. A very lineal or straight hairstyle would look weird in Bart.
Once his hair is done, make a long straight line downwards to shape the rest of his head and, as in all Simpson characters, make a “c” with a rounded “T” inside to get his ear. Make a slightly curved line to get the back of his neck.
Next, make a slightly oblique line from below the nose and curve to the left as a curve, this is to make Bart’s lips. Finally, finish his mouth and neck by drawing a small curved line.
You got your Bart Simpson drawing!
Click here to learn how to draw Bart Simpson!
How to draw with a Simpson style: some things to take into account
How to draw Simpson characters may seem something easy to do, but they are unique and it is not actually something that easy to draw. We do recommend you to be really patient at first, do not expect to draw these characters perfectly in the first try.
It requires dedication and a bit of practice. However, do not forget this: the geometrical shapes and lines are crucial. Very round eyes, straight lines, round circles for necklaces, etc.
You can do it! Enjoy practicing and learning how to draw Simpson characters!
On the web page Get Cartoonizer you can get your own personalized cartoon of The Simpson! With friends, your partner, your family or your pets, as you like the most.
Done by great professionals, your Simpson cartoon will look original and with a great quality.